Creating Custom FastHTML Tags for Markdown Rendering
Step by step tutorial to rendering markdown in FastHTML using zero-md
Intro
This post will cover how to render markdown using zero-md in FastHTML in a practical example. This includes:
- Defining a custom HTML tag in FastHTML
- Using external CSS and javascript libraries with FastHTML
- Adding CSS styling
- Organize UI into columns
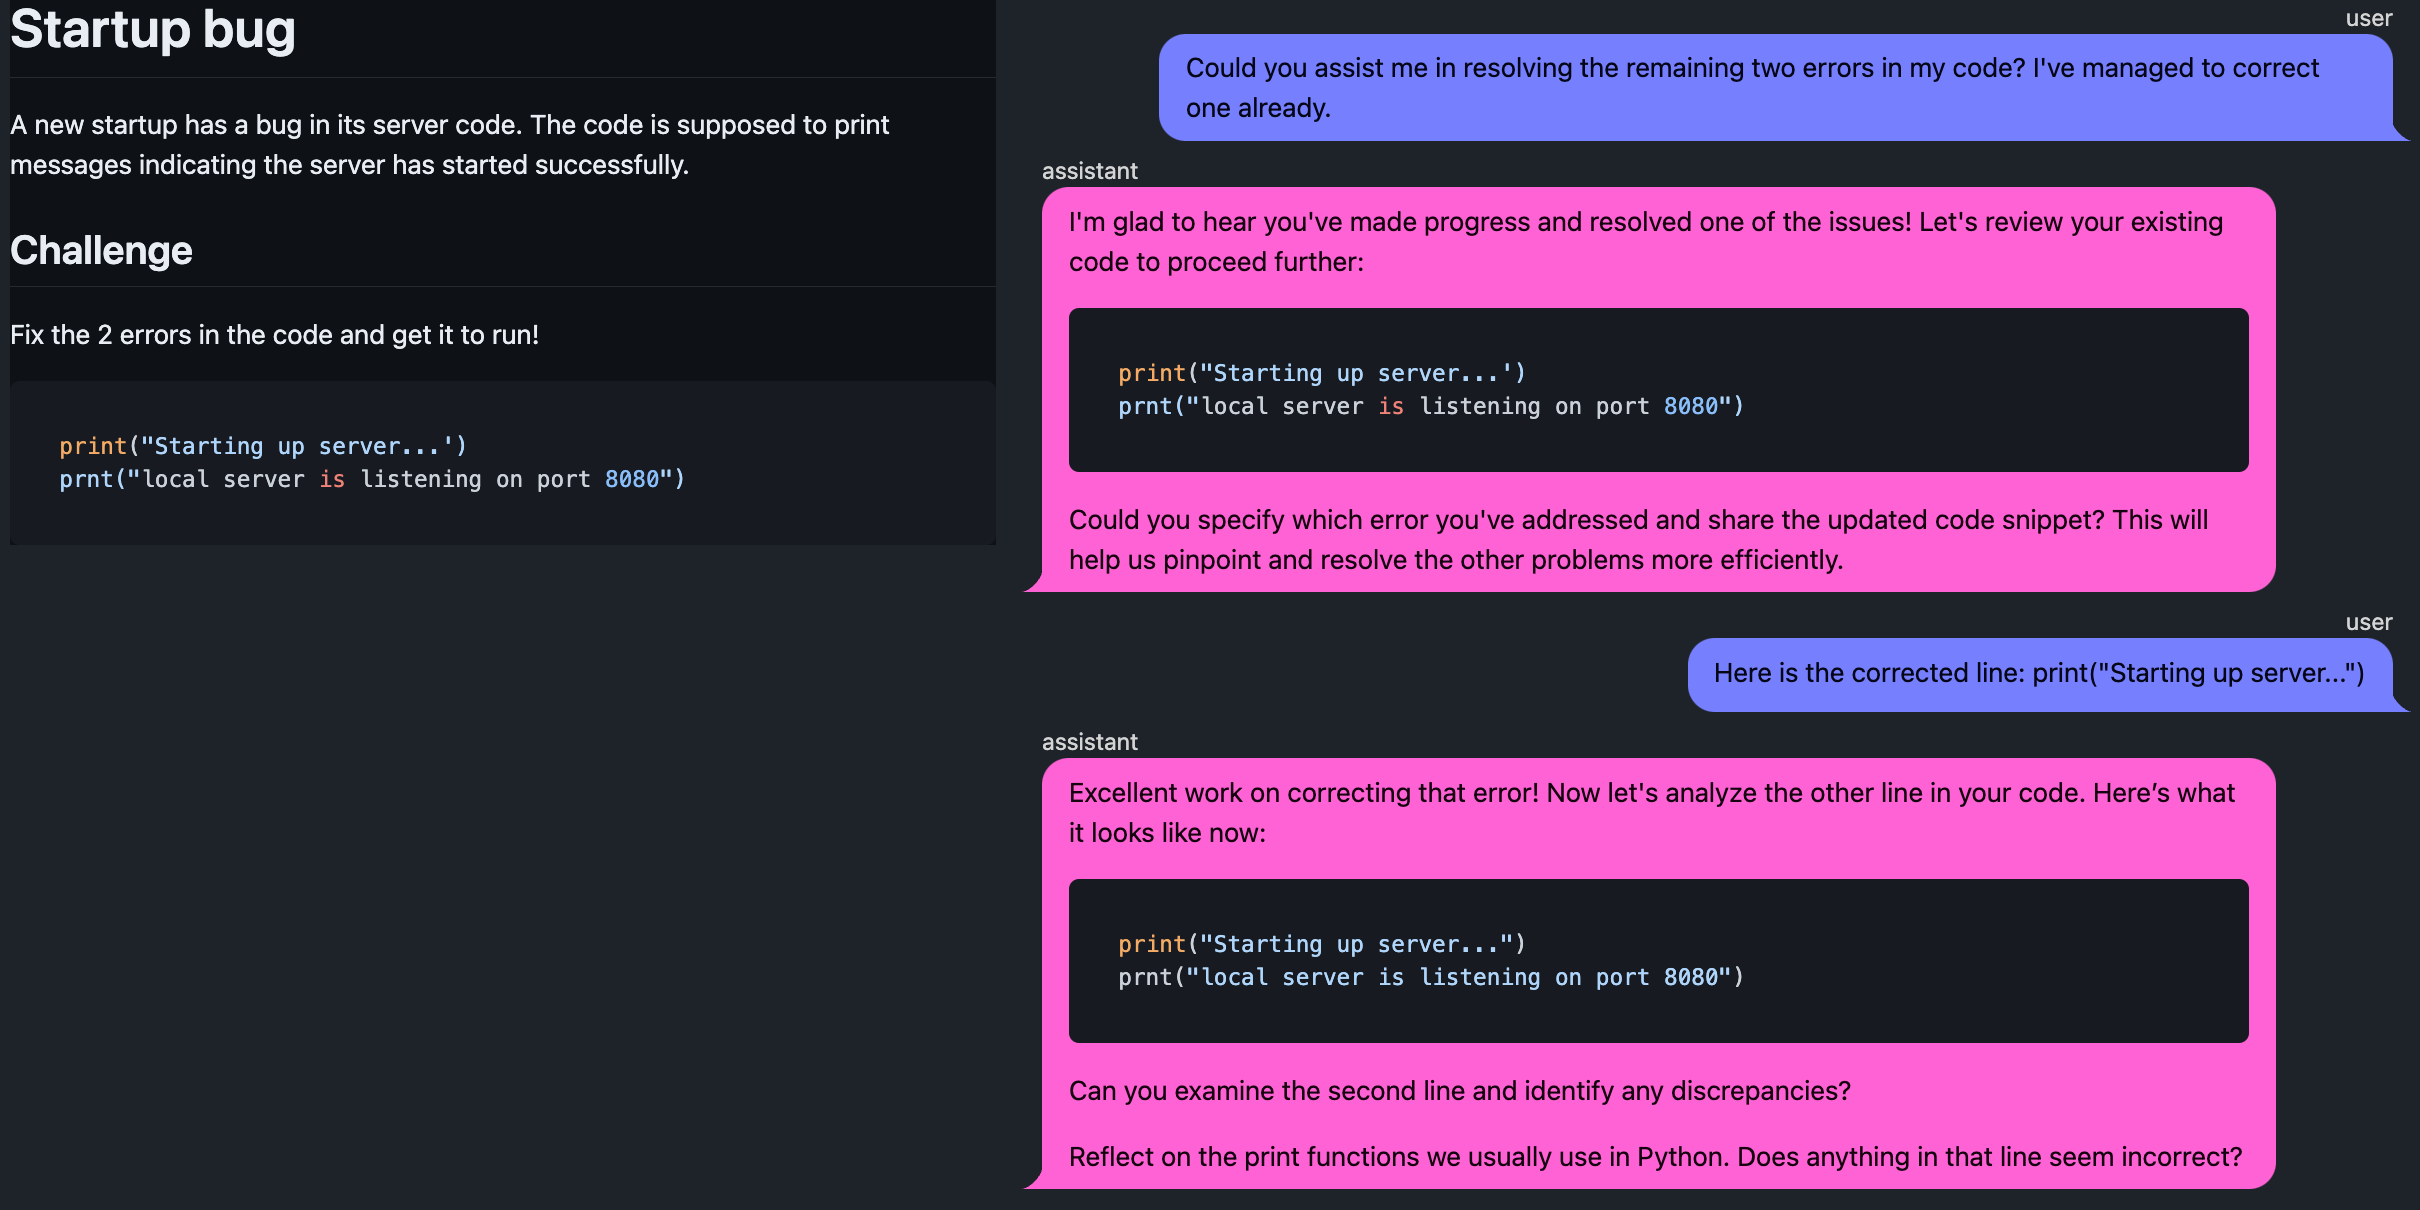
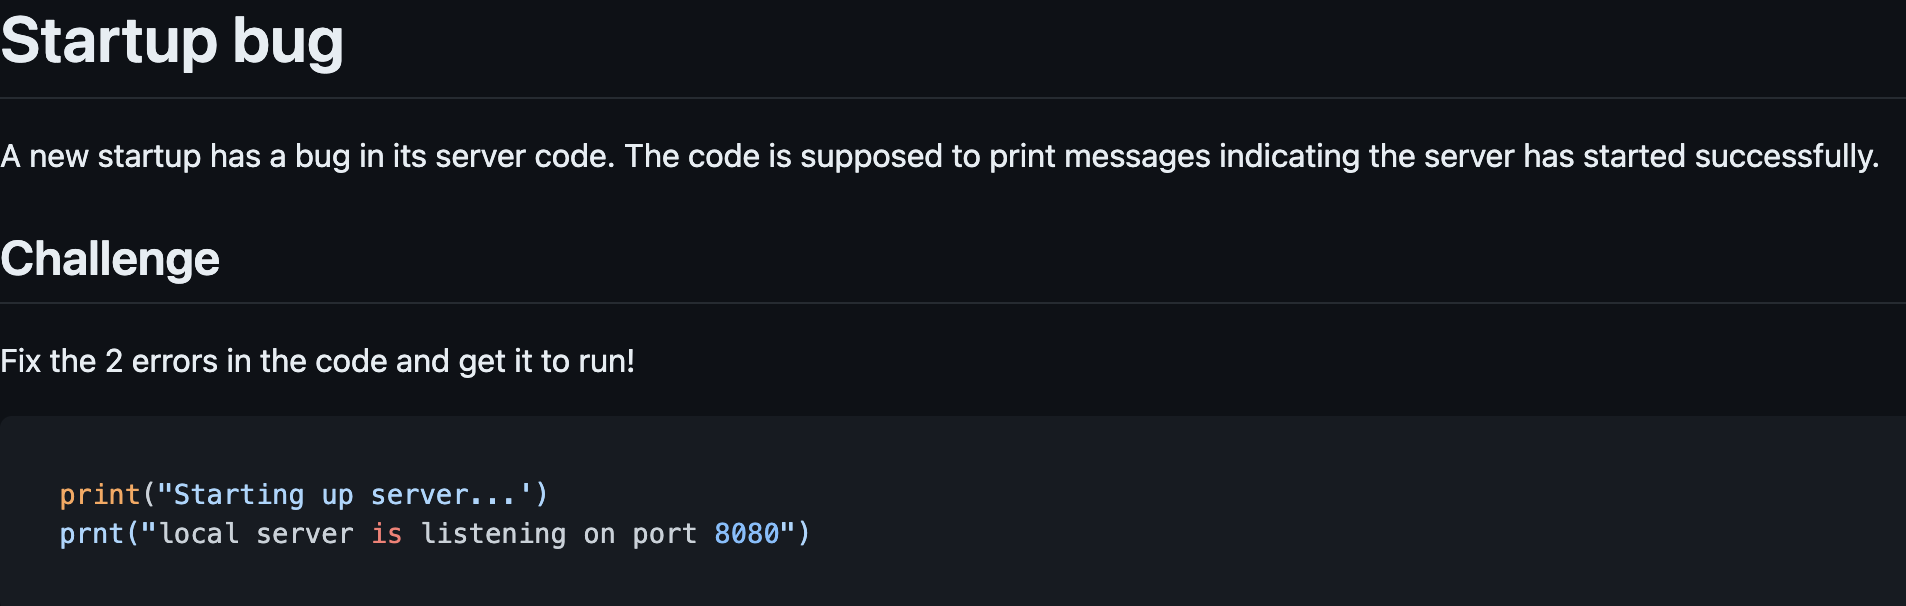
In this tutorial we will convert a markdown of an early lesson in the boot.dev curriculum and a fake conversation between a student and a chatbot about the lesson to HTML. Boot.dev is an online learning platform that offers self-paced, gamified courses for back-end web development.
Markdown With Zero-md
# Import style 1
from fasthtml.common import *
from functools import partial

# Import style 2
from fasthtml.core import P, Script, Html, Link, Div, Template, Style, to_xml
from fasthtml.components import show
In FastHTML we can use the P function to put text in a paragraph <p></p> tag (a common way of displaying text). However, markdown is not rendered properly and is hard to read!
While text can be read without styling, markdown has headers, code, bullets and other elements. So we need something more than just a regular text rendering.
We need to convert markdown formatting into a format that HTML understands. We can use a javascript library called zero-md to do this, but this tag does not have a function in FastHTML. There are still two options for using this tag in FastHTML.
💡 What is zero-md?
In web development, HTML defines the general structure of a web page. However, HTML alone is usually not sufficient. Javascript allows us to extend what we can do beyond out-of-the-box HTML.
zero-mdis a Javascript library that adds functionality for displaying markdown content that we can use with an HTML tag.
The first option is to write the HTML in a text string and use that.
NotStr(f'''<zero-md><script type="text/markdown">{lesson_content}</script></zero-md>''')
💡 Tip
NotStris a FastHTML function designed for passing a string that should be executed as HTML code rather than a string. In the example above, becauseNotStris used, FastHTML will treat it as HTML code rather than a Python string. If we removed theNotStr, all the HTML tags would be displayed on the page just as they are written rather than being rendered nicely for your web application.
This is fine for very simple things, but the more you build, the messier and harder it gets to work with. It is better to create a FastHTML style tag that works just like everything else. It's incredibly simple to create a custom tag. By importing from fasthtml.components the HTML tag will be created automatically (defined in the module's __getattr__).
from fasthtml.components import Zero_md
Now that we have our custom tag defined, we can use that with the <script> tag (included in FastHTML) to apply the formatting per the zero-md documentation. For now, we will use the defaults and do nothing with CSS (more details on this later).
def render_local_md(md, css = ''):
    css_template = Template(Style(css), data_append=True)
    return Zero_md(css_template, Script(md, type="text/markdown"))

lesson_content_html = render_local_md(lesson_content)
print(to_xml(lesson_content_html))
The last thing we need to do is load zero-md from a CDN. We can do this by adding a <script> tag to the <head> of the HTML, and it all works!
with open('static/_readme.md') as f: lesson_content = f.read()

zeromd_headers = [Script(type="module", src="https://cdn.jsdelivr.net/npm/zero-md@3?register")]
Html(*zeromd_headers, lesson_content_html)
Markdown Conversation Bubbles
We will start with default DaisyUI chat bubbles. For many types of conversations this is fine, but for this use case we need markdown to render properly for code snippets and structural elements.
💡 Note
This part of the tutorial picks up where the step-by-step the DaisyUI example in the FastHTML documentation leaves off. For more information, start there!
#loading messages
import json
with open('static/conversation.json') as f:
    messages = json.load(f)['messages']
# Loading tailwind and daisyui
chat_headers = [Script(src="https://cdn.tailwindcss.com"),
           Link(rel="stylesheet", href="https://cdn.jsdelivr.net/npm/daisyui@4.11.1/dist/full.min.css")]
We re-use the code from the daisyUI example with one change. We are using the render_local_md function we defined.
# Functionality identical to Daisy UI example linked above
def ChatMessage(msg, render_md_fn=lambda x: x):
    md = render_md_fn(msg['content'])
    return Div(
        Div(msg['role'], cls="chat-header"),
        Div(md, cls=f"chat-bubble chat-bubble-{'primary' if msg['role'] == 'user' else 'secondary'}"),
        cls=f"chat chat-{'end' if msg['role'] == 'user' else 'start'}")
Using this, markdown doesn't render properly, causing readability issues.
Instead let's do exactly what we did before with Zero-md. Our markdown renders, however there are some issues with css styles clashing.
chat_bubble =Html(*(chat_headers+zeromd_headers), ChatMessage(messages[1], render_md_fn=render_local_md))
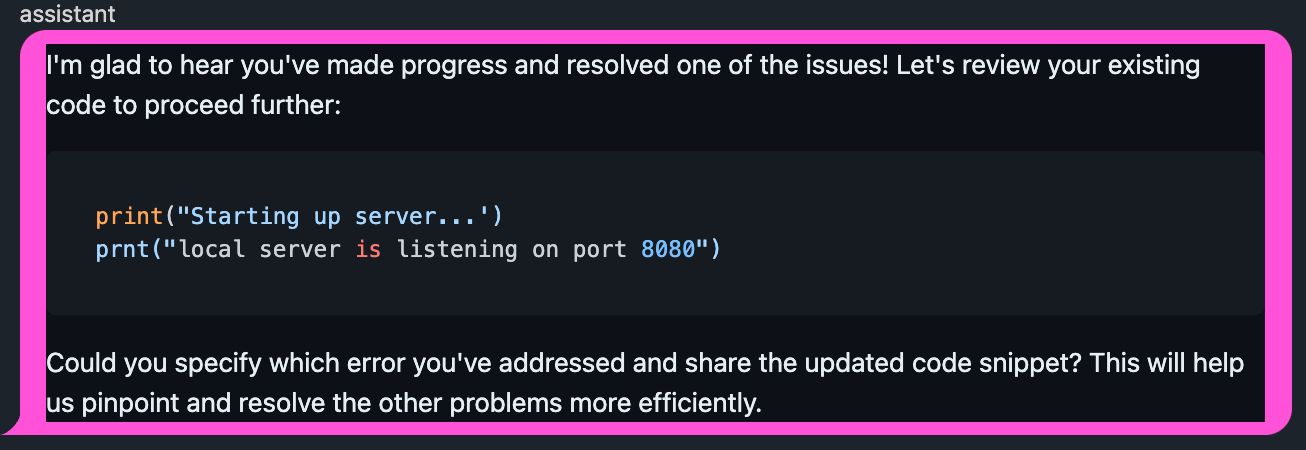
We can inject CSS styling to handle this issue by telling zero-md to use a template and ignore the default styles to make beautiful properly rendered conversations.
💡 Tip
CSS allows us to extend what we can do with just HTML by providing a syntax for adding styling to HTML elements in a programmatic way. You may want every header to have a specific text color or every paragraph to have a specific background color. CSS allows us to do that.
css = '.markdown-body {background-color: unset !important; color: unset !important;}'
_render_local_md = partial(render_local_md, css=css)
chat_bubble = Html(*(chat_headers+zeromd_headers), ChatMessage(messages[1], render_md_fn=_render_local_md))
Now that it looks good we can apply this style to all messages

Putting it Together
We can add FlexBox to organize content on a page to design our UI and see it in action.
💡 Tip
Like we saw the
zero-mdjavascript library, we can import CSS libraries into our HTML. FlexBox is a CSS library that allows you to define classes on elements and it styles them based on the class names (such as"col-xs-5"to define a column width).
flexbox = [Link(rel='stylesheet', href='https://cdnjs.cloudflare.com/ajax/libs/flexboxgrid/6.3.1/flexboxgrid.min.css', type='text/css')]
all_headers = zeromd_headers + chat_headers + flexbox

chatbox = [ChatMessage(msg, render_md_fn=_render_local_md) for msg in messages]

conversation_ui = Html(*all_headers,
          Div(
              Div(lesson_content_html, cls="col-xs-5"),
              Div(*chatbox, cls="col-xs-7"),
              cls="row"))